
Water spinach, also known as kangkong or Ipomoea aquatica, is one of the most popular leafy vegetables in Asian cuisines. It’s versatile, nutrient-rich, and remarkably easy to grow. What’s even better? You don’t need a garden plot or fancy equipment—an old gallon jug can be transformed into a mini hydroponic system or container garden for water spinach.
In this blog post, we’ll guide you step by step on how to repurpose a gallon jug to grow fresh, healthy water spinach at home. You’ll learn the materials you need, planting tips, care instructions, and harvesting strategies, all while practicing eco-friendly gardening.
Why Grow Water Spinach at Home?
- Freshness: Water spinach harvested at home is far fresher than store-bought options.
- Health Benefits: It’s rich in vitamin A, vitamin C, iron, and fiber, supporting immunity and overall health.
- Easy to Grow: Water spinach is fast-growing and resilient, thriving even in small containers.
- Sustainable: Using an old gallon jug reduces household waste and encourages upcycling.
- Cost-Effective: One jug can continuously produce leafy greens for weeks.
Step 1: Preparing Your Gallon Jug
Before planting, it’s important to get your jug ready:
- Clean the Jug: Rinse thoroughly to remove any residue from milk, water, or other liquids.
- Cut Openings:
- Use a utility knife or scissors to create a large opening at the top for planting.
- Optionally, cut a few small holes on the side near the bottom for drainage if you plan to use soil.
- Optional Handles: If the jug is heavy, you can attach a string or rope handle for easier movement.
Step 2: Choosing the Growing Medium

Water spinach can grow in soil-based containers or water (hydroponic style). Both methods are effective, depending on your preference and available resources.
Option 1: Soil-Based Growing
- Soil Mix: Use a combination of potting soil, compost, and sand for drainage (2:1:1 ratio).
- Filling the Jug: Fill about ¾ of the jug with the soil mixture, leaving room at the top for watering.
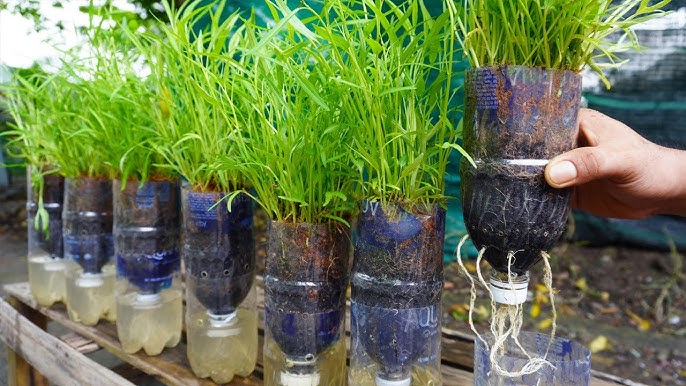
Option 2: Hydroponic Growing
- Water-Only Method: Water spinach can grow directly in water without soil.
- Nutrients: For optimal growth, dissolve a small amount of liquid fertilizer or compost tea in the water to provide essential nutrients.
Step 3: Planting Water Spinach

Water spinach can be grown from seeds or cuttings. Cuttings are faster and more reliable for container growing.
Using Cuttings
- Select healthy stems from mature water spinach plants. Each cutting should be 6–8 inches long with at least 2–3 nodes.
- Remove leaves from the lower part to prevent rotting.
- Place the cuttings in water or directly into moist soil in your gallon jug.
- Ensure at least one node is submerged in water or buried in soil for root development.
Using Seeds
- Soak seeds in water for a few hours to improve germination.
- Sow seeds ½–1 inch deep in soil-filled jug.
- Keep soil consistently moist until seedlings emerge (usually 5–10 days).
Step 4: Caring for Water Spinach

Water spinach grows quickly, but it still needs proper care:
- Sunlight: Place the jug in a spot that receives 4–6 hours of sunlight daily. Partial shade is fine in hot climates.
- Watering:
- Soil-based: Keep soil consistently moist but not waterlogged.
- Hydroponic: Ensure water covers the roots and replace water every 1–2 weeks, adding nutrients if needed.
- Fertilization: Use diluted organic fertilizer, fish emulsion, or compost tea every 2–3 weeks for healthy leaves.
- Pruning: Regularly trim stems to encourage bushier growth and prevent flowering too early, which can reduce leaf quality.
Step 5: Harvesting Water Spinach
Water spinach grows rapidly, often ready to harvest in 3–4 weeks from planting.
- Harvesting Tips:
- Cut stems 2–3 inches above the base. New shoots will continue growing.
- Avoid harvesting more than 1/3 of the plant at a time to allow continued growth.
- Regular harvesting promotes continuous leaf production.
- Usage: Water spinach is ideal for stir-frying, soups, or fresh salads. Homegrown leaves are tender and flavorful.
Step 6: Maintaining Continuous Growth
To ensure a steady supply of water spinach:
- Succession Planting: Start new cuttings every 2–3 weeks.
- Rotate Cuttings: Replace older plants that are slowing down with fresh cuttings.
- Monitor Pests: Aphids and snails can be occasional problems. Remove manually or use organic sprays.
Advantages of Growing in a Gallon Jug

- Space-Saving: Perfect for small balconies, kitchen windows, or urban apartments.
- Recycling: Repurposes household waste, reducing plastic consumption.
- Portable: Move the jug indoors during extreme weather.
- Low-Cost: Minimal investment needed—use cuttings or seeds and a jug you already have.
- Fast-Growing: Water spinach produces leaves quickly, giving multiple harvests from a single planting.
Tips for Success
- Choose Healthy Cuttings: Strong, disease-free stems will root faster and produce more leaves.
- Use Fertilized Water: If using hydroponics, add a balanced organic fertilizer to the water to accelerate growth.
- Maintain Sunlight: Even indoors, water spinach thrives near windows with natural light.
- Regular Pruning: Keeps the plant bushy and encourages new growth.
- Keep Water Clean: For hydroponic setups, change water regularly to prevent stagnation and algae growth.
Conclusion
Growing water spinach at home is easy, rewarding, and sustainable. An old gallon jug, which might otherwise end up in the trash, can be transformed into a productive mini-garden that provides fresh, nutrient-rich leafy greens for your family.
By following these steps—preparing the jug, choosing the right growing medium, planting cuttings or seeds, and maintaining proper care—you can enjoy continuous harvests of tender water spinach. This method not only saves money but also helps reduce waste and promotes eco-friendly gardening practices.
Start today, and you’ll be amazed at how quickly water spinach grows in such a simple, recycled container. Fresh, green, and delicious leaves are just a jug away!