
lf you’ve ever thought peanuts could only grow in large fields or open farmland, think again! With just a foam box and a little know-how, you can grow your own peanuts at home—even in small spaces like balconies, patios, or rooftops. This method proves that minimal soil doesn’t have to mean minimal harvest. In this guide, we’ll walk you through how to grow peanuts easily using a foam box, while maximizing your yield with minimal effort.
Why Grow Peanuts at Home?

Peanuts (Arachis hypogaea) are a nutrient-packed legume that can thrive in warm climates and containers. They are rich in protein, healthy fats, and essential vitamins, making them a great addition to your diet. Growing peanuts at home comes with several benefits:
- Freshness: Homegrown peanuts are free from pesticides and chemicals.
- Cost-saving: A small foam box of peanuts can provide months of harvest at a fraction of the cost of store-bought nuts.
- Sustainability: Growing your own legumes helps improve soil fertility through nitrogen fixation.
- Fun and educational: Peanut cultivation is a fascinating process to observe, especially as the peanuts form underground.
This method is particularly appealing for urban gardeners who don’t have access to large plots of land.
Step 1: Choosing Your Peanuts

The first step is selecting the right peanuts for planting. Not all peanuts from the store will sprout successfully, as some are roasted or treated. Look for:
- Raw, unshelled peanuts: Avoid roasted or salted peanuts, as they won’t germinate.
- Fresh and plump peanuts: The healthier the seed, the higher the chance of successful growth.
- Variety: If possible, select varieties suited for container planting, which are usually smaller and bushier than field varieties.
Once you have the right peanuts, it’s time to prepare your foam box.
Step 2: Preparing the Foam Box
A foam box is a surprisingly effective container for growing peanuts because it is lightweight, retains moisture, and can be easily moved. Here’s how to prepare it:
- Choose the right size: A box of around 30–50 liters is sufficient for several peanut plants.
- Create drainage holes: Punch multiple small holes at the bottom to prevent waterlogging. Proper drainage is essential because peanuts are prone to rot if the soil stays soggy.
- Add soil: Use light, well-draining soil. A mix of garden soil, compost, and sand in a 2:1:1 ratio works well. The soil should be loose enough for the peanuts to push through as they grow underground.
Step 3: Planting Peanuts
Planting peanuts in a foam box is simple and doesn’t require deep soil layers. Follow these steps:
- Soak peanuts: Soak the raw peanuts in water overnight to soften the shell and promote sprouting.
- Plant spacing: Place peanuts 5–8 cm apart and about 3–5 cm deep in the soil. The pointed end should face downward.
- Cover lightly: Gently cover the seeds with soil and press lightly to ensure good contact.
Peanuts are unique because they flower above ground but form pods underground. This “geocarpy” process requires loose, aerated soil for successful pod development.
Step 4: Watering and Care
Peanuts require moderate watering and consistent care, especially in a foam box. Here’s what to do:
- Watering: Keep the soil evenly moist but avoid waterlogging. Watering every 2–3 days is usually sufficient, depending on your climate.
- Sunlight: Peanuts need full sun for at least 5–6 hours daily. Place your foam box in a sunny spot.
- Fertilization: Use organic fertilizer or compost every 3–4 weeks. Peanuts are legumes, so they naturally enrich the soil with nitrogen, but young plants benefit from some additional nutrients.
Step 5: Supporting Plant Growth

Peanut plants are low-growing, bushy vines that can reach 30–50 cm in height. While they don’t need trellising like climbing plants, there are a few tips to encourage healthy growth:
- Weeding: Remove any weeds that may compete for nutrients.
- Mulching: Cover the soil with straw or dried leaves to retain moisture and regulate temperature, which is especially helpful in hot weather.
- Observation: Look out for yellowing leaves, which may indicate nutrient deficiency or overwatering. Adjust care as needed.
Step 6: Flowering and Peg Formation
One of the most fascinating aspects of peanut cultivation is watching the flowering and peg formation. The plant produces small yellow flowers above the soil. After pollination, the flower stalk elongates and pushes the ovary into the soil to form peanuts.
- Patience is key: This process takes several weeks. Avoid disturbing the soil where the pegs penetrate.
- Soil looseness: Ensure the soil remains loose to allow easy peg penetration and pod development.
This stage is critical for a maximum harvest, so careful observation is essential.
Step 7: Harvesting Peanuts

Peanuts are usually ready to harvest 90–120 days after planting, depending on the variety. Signs that your peanuts are ready include:
- Leaves turning yellow and starting to wilt
- Mature pods forming underground that are plump and firm
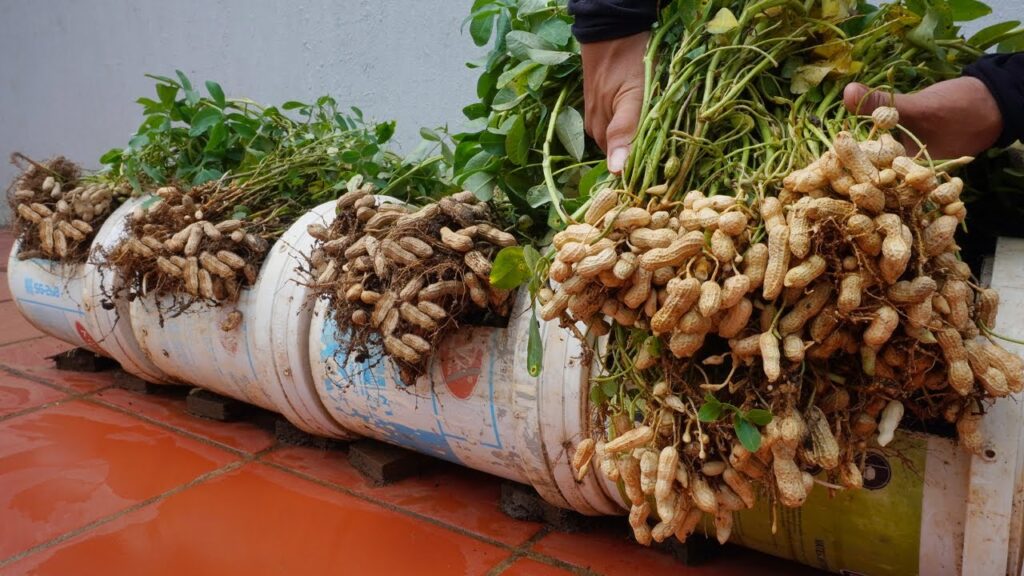
To harvest, gently dig up the foam box soil to avoid damaging the pods. Shake off excess soil and let the peanuts dry for a few days in a shaded area. Once dry, they’re ready to eat or store.
Step 8: Maximizing Your Yield
Even with minimal soil, you can maximize your peanut harvest by following these tips:
- Dense planting: Don’t overcrowd; a few well-spaced plants perform better than many crowded seeds.
- Succession planting: Start a new batch of peanuts every few weeks to ensure continuous production.
- Reusing soil: After harvesting, refresh the soil with compost and a little sand, and plant the next batch.
Step 9: Common Problems and Solutions
Growing peanuts in a foam box is relatively easy, but some issues may arise:
- Pests: Aphids or mites can attack young leaves. Neem oil or insecticidal soap works well.
- Diseases: Root rot or fungal infections may occur if drainage is poor. Ensure adequate drainage and avoid overwatering.
- Heat stress: Peanuts love warmth, but extreme heat can dry the soil too quickly. Mulch and water consistently to protect roots.
Step 10: Enjoying Your Homegrown Peanuts
The reward of growing peanuts in a foam box is not just the harvest—it’s the experience. Peanuts can be used in countless ways: roasted, boiled, ground into peanut butter, or added to dishes for extra protein. Growing them at home also provides an educational experience for children and adults alike, showing the fascinating process of a plant producing food underground.
Even with minimal soil, a small foam box can produce a surprising number of peanuts, proving that with the right care, urban gardening can be both efficient and rewarding.
Conclusion
Growing peanuts in a foam box is a simple, space-saving method that allows anyone to enjoy fresh, homegrown peanuts. From selecting raw peanuts and preparing the foam box to watering, fertilizing, and harvesting, this method combines minimal effort with maximum results. Whether you’re an urban gardener with limited space or just curious about growing your own legumes, this approach makes peanut cultivation accessible, fun, and productive.
So grab a foam box, some raw peanuts, and start your journey to a bountiful harvest today. With a little patience and care, you’ll be enjoying crunchy, delicious peanuts straight from your own home garden in just a few months!