
Who says you need a big garden to grow delicious, juicy watermelons? With a bit of creativity and recycling spirit, you can turn old plastic bottles into mini hanging gardens — perfect for cultivating sweet, full-sized watermelons right on your balcony, terrace, or backyard wall.
The “plastic bottle watermelon hammock” method is taking the DIY gardening world by storm. It combines urban farming, waste reduction, and smart vertical gardening — and it truly works!
In this post, we’ll show you step-by-step how to reuse plastic bottles to grow watermelon vines, support the fruits with hanging hammocks, and get surprisingly large, sweet melons without needing ground space.
1. Why Grow Watermelon in Hanging Plastic Bottles?
Before diving into the method, let’s understand why this is so ingenious.
Most gardeners assume watermelons need sprawling ground space and deep soil — but with smart techniques, they can thrive in containers and hanging setups.
Using plastic bottles offers multiple benefits:
- Eco-friendly: Recycle and reuse plastic waste instead of throwing it away.
- Space-saving: Perfect for small terraces, balconies, or rooftop gardens.
- Aesthetic: Hanging vines and fruit hammocks look gorgeous and unique.
- Mobility: You can move your bottles to catch more sunlight.
- Healthy growth: Controlled soil and watering reduce pests and rot.
It’s a brilliant way to grow food sustainably — turning trash into something tasty and productive.
2. What You’ll Need
To start your hanging watermelon garden, gather these supplies:
Materials:
- 5-liter or larger plastic bottles (depending on fruit size)
- Sharp knife or cutter
- A drill or hot nail for making holes
- Strong rope, wire, or nylon cord for hanging
- Potting mix (see below)
- Watermelon seeds or seedlings (choose a dwarf or small-fruit variety)
- Compost or organic fertilizer
- Optional: old cloth, mesh bag, or jute piece for fruit hammock support
3. Choosing the Right Watermelon Variety
Not all watermelons are suited for container or hanging growth. You’ll want compact, fast-growing types that produce small to medium fruits.
Here are some ideal container-friendly watermelon varieties:
- Sugar Baby (compact vines, 3–5 kg fruits)
- Mini Love (sweet, 2–3 kg fruits, high yield)
- Golden Midget (tiny vines, fruits in 70 days)
- Bush Sugar Baby (short vines, perfect for pots or bottles)
These varieties are small but flavorful, making them perfect for vertical gardens.
4. Preparing the Plastic Bottles
Now comes the creative part — turning waste into planters!
Steps to make your watermelon bottle planter:
- Cut the bottle:
- Take a large plastic bottle (5–10 liters).
- Cut a rectangular opening on one side (about 4×6 inches) — this will be the planting hole.
- Make drainage holes:
- Poke 4–6 small holes at the bottom to prevent waterlogging.
- Thread the ropes:
- Use two strong ropes or wires on opposite sides of the bottle’s neck and base.
- Tie them securely so that when hung, the bottle sits horizontally with the opening on top.
- Fill with soil mix:
- Fill two-thirds of the bottle with your potting mix (explained next).
- Leave a little space at the top for watering.
Your recycled hanging planter is now ready!
5. The Perfect Soil Mix for Watermelons
Watermelons thrive in light, rich, and well-draining soil.
Since we’re using bottles, drainage and aeration are crucial.
Recommended mix:
- 40% garden soil or loamy soil
- 30% organic compost or cow dung manure
- 20% coco peat or sand (for aeration)
- 10% vermicompost or leaf mold
Add a handful of neem cake powder or bone meal for extra nutrients. Mix thoroughly before filling your bottles.
This ensures your watermelon roots grow strong and healthy even in limited space.
6. Planting the Watermelon Seeds or Seedlings
You can either germinate seeds first in small cups or plant them directly into the bottles.
Direct planting method:
- Place 2–3 seeds per bottle, about 1 inch deep.
- Water gently until the soil is moist (not soggy).
- Keep the bottles in a warm, sunny spot.
- Seeds will germinate in 5–10 days.
- Once seedlings grow 3–4 leaves, keep the healthiest one and remove the others.
If you’re transplanting seedlings, choose ones that are about 2 weeks old and handle them carefully to avoid root damage.
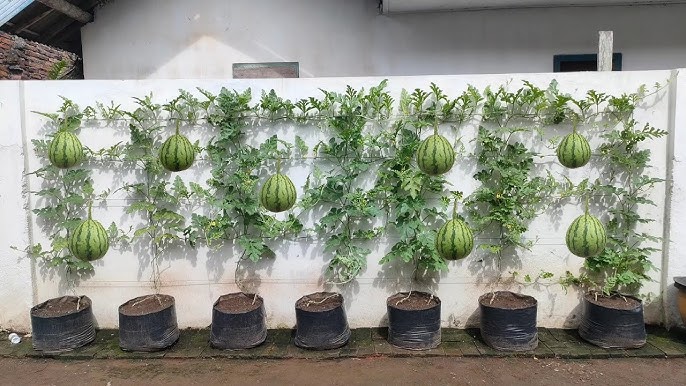
7. Hanging and Positioning Your Bottle Planters
Once your bottles are planted, hang them securely on a strong railing, metal frame, or terrace hook.
Positioning tips:
- Sunlight: Watermelons need at least 6–8 hours of full sunlight daily.
- Height: Hang bottles at waist or chest level for easy watering and maintenance.
- Spacing: Keep at least 1 meter (3 feet) between each bottle so vines can spread.
As vines grow, guide them using wires or ropes, allowing them to trail downward beautifully.
You can also train them horizontally across a wall or trellis.
8. Watering and Feeding Your Watermelon Plants
Watermelon roots love moisture, but not standing water.
Watering tips:
- Keep the soil slightly moist — water deeply 2–3 times a week.
- Reduce watering as fruits begin to ripen to improve sweetness.
- Avoid splashing leaves to prevent fungal diseases.
Fertilization schedule:
- After 3 weeks: Add compost or organic fertilizer around the roots.
- Every 15 days: Feed liquid compost tea or diluted seaweed solution.
- During fruiting: Increase potassium (add banana peel compost or organic potash).
This helps the vines produce strong fruits even in small containers.
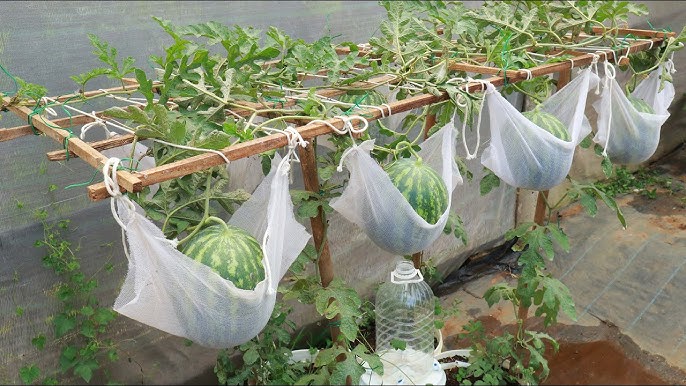
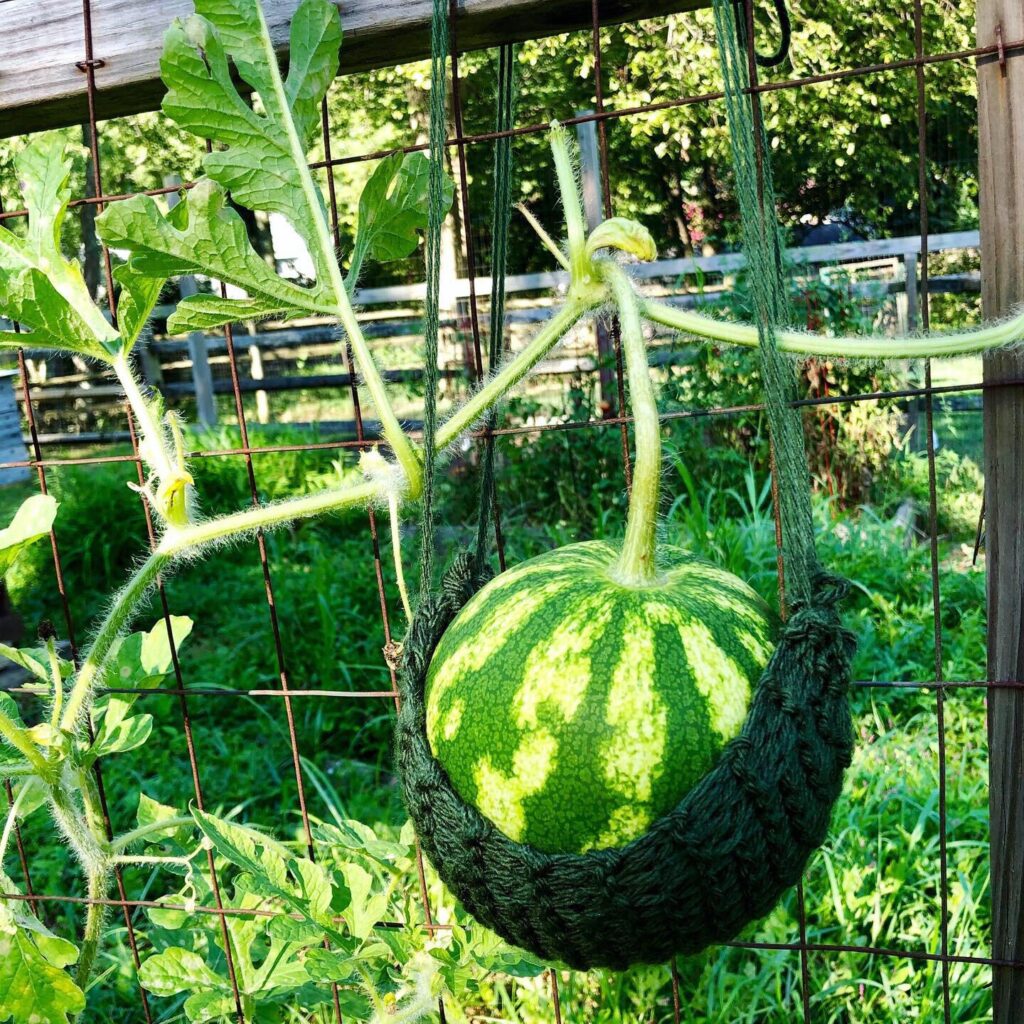
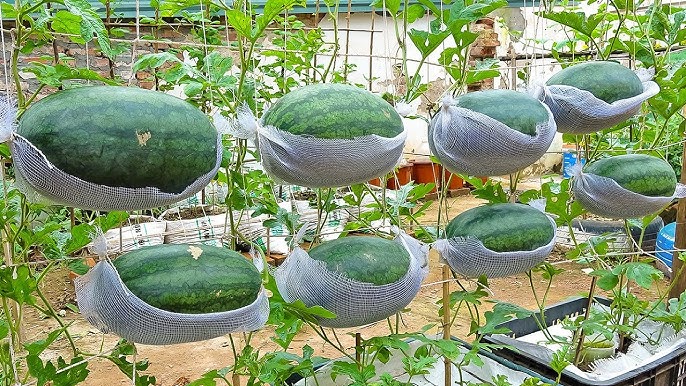
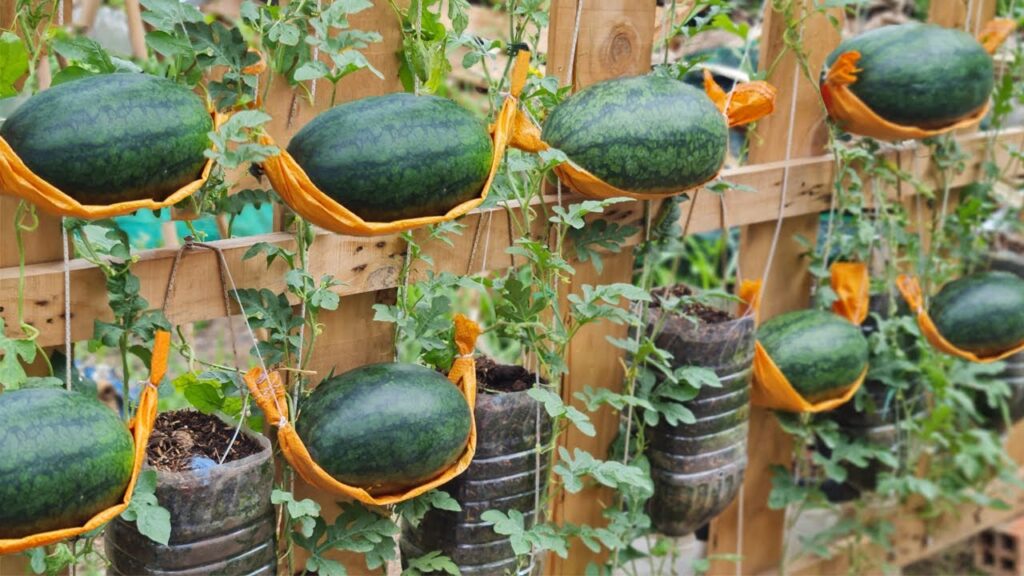
9. Supporting Fruits with Hanging Hammocks
As your watermelons grow heavier, the vines need support — otherwise, fruits may snap off.
This is where the “hammock” trick comes in!
How to make a fruit hammock:
- Take an old cloth, jute sack, or mesh net.
- Cut a piece large enough to cradle the growing fruit.
- Tie the ends to the support wire or railing so it gently holds the fruit’s weight.
This “hanging hammock” keeps the watermelon off the ground (or air!) and prevents it from rotting, bruising, or falling.
It’s functional, eco-friendly, and looks adorable too!
10. Pollination and Fruit Setting
Watermelon plants produce male and female flowers separately, usually within 30–45 days of planting.
- Male flowers: Appear first in clusters.
- Female flowers: Have a small round bulge (baby fruit) behind the petals.
If you’re growing indoors or on a terrace with few insects, hand pollination ensures fruiting.
Hand pollination method:
- Pick a fresh male flower.
- Remove its petals to expose the pollen.
- Gently brush it onto the center of the female flower.
- Repeat for a few days in the morning.
If pollination is successful, the tiny fruit will start growing rapidly within a week.
11. Growth, Ripening, and Harvesting
Once fruits start forming, your hanging garden will look magical — tiny green melons growing in bottle hammocks!
Growth timeline:
- Germination: 1 week
- Flowering: 4–6 weeks
- Fruit development: 6–8 weeks
- Harvest: Around 80–100 days from planting
Signs of ripeness:
- The fruit changes color slightly (a duller green).
- The tendril near the fruit stem dries out.
- The base of the fruit gives a hollow sound when tapped.
- The underside (touching the hammock) turns creamy yellow.
Harvest carefully using a knife or scissors, and enjoy your sweet, homegrown watermelon!
12. Common Problems and Solutions
| Problem | Possible Cause | Solution |
|---|---|---|
| Yellow leaves | Overwatering | Reduce watering, improve drainage |
| Flowers falling off | Poor pollination | Hand-pollinate regularly |
| Small fruits | Lack of nutrients | Feed potassium and phosphorus-rich fertilizer |
| Fruit cracking | Uneven watering | Maintain consistent moisture |
Watermelons are quite hardy once established — just watch for pests like aphids or whiteflies, and spray neem oil if needed.
13. Why This Method Works
The plastic bottle method works for three key reasons:
- Controlled soil and moisture prevent rot.
- Vertical growth reduces pest issues and increases sunlight exposure.
- The hammock technique supports fruits safely while improving air circulation, leading to sweeter melons.
You’re essentially combining container gardening, hydroponic principles, and upcycling — a true blend of sustainability and creativity.
14. Final Thoughts: Sustainable Gardening at Its Sweetest
Who would have thought that a few discarded plastic bottles could grow something as big and sweet as a watermelon?
By reusing old bottles and adding a simple hanging hammock, you can transform waste into lush green beauty — and juicy, refreshing fruit.
This method is perfect for urban gardeners, eco-conscious families, or anyone looking to add creativity to their gardening routine.
It’s practical, sustainable, and endlessly satisfying.
So next time you finish a bottle of water or juice, don’t throw it away.
Turn it into a tiny garden — and soon, you’ll be slicing into your very own homegrown watermelon, grown in the air, sweet and full of flavor.