Imagine stepping onto your terrace or balcony and spotting golden, netted cantaloupes dangling from vines — sweet, fragrant, and ready to pick. Sounds impossible? Not anymore!
With the special hanging melon growing method, you can grow large, juicy cantaloupes right at home, even if you don’t have a big garden. This technique combines container gardening and vertical support systems, allowing the fruit to hang freely while maturing perfectly — resulting in sweeter and cleaner melons.
In this post, you’ll learn step-by-step how to grow cantaloupe (muskmelon) in pots or hanging setups, from seed to harvest, using simple materials and eco-friendly tricks.
1. Why Grow Cantaloupe at Home?
Cantaloupe, also known as muskmelon, is one of the most refreshing summer fruits. Packed with water, vitamins, and natural sweetness, it’s both healthy and rewarding to grow.
When cultivated at home:
- You control what goes into your soil — no chemicals, no pesticides.
- The fruits taste sweeter and more aromatic when ripened naturally on the vine.
- You can grow them even in small spaces — terraces, balconies, or patios.
- The hanging melon method helps you maximize space and airflow, keeping fruits clean and disease-free.
It’s a fun, educational, and sustainable way to bring nature closer to home.
2. Choosing the Right Cantaloupe Variety
Cantaloupes come in several varieties, but not all are suitable for small spaces. For home gardens or hanging systems, go for compact, early-maturing varieties.
Recommended varieties:
- Sugar Cube: Small, sweet fruits with netted skin; great for pots.
- Minnesota Midget: Early maturing, 70–80 days from seed to harvest.
- Hales Best Jumbo: Classic cantaloupe with rich aroma and flavor.
- Honey Rock: Known for its sweetness and resistance to disease.
Choose seeds from a reliable source or dry your own from an organic fruit you enjoyed.
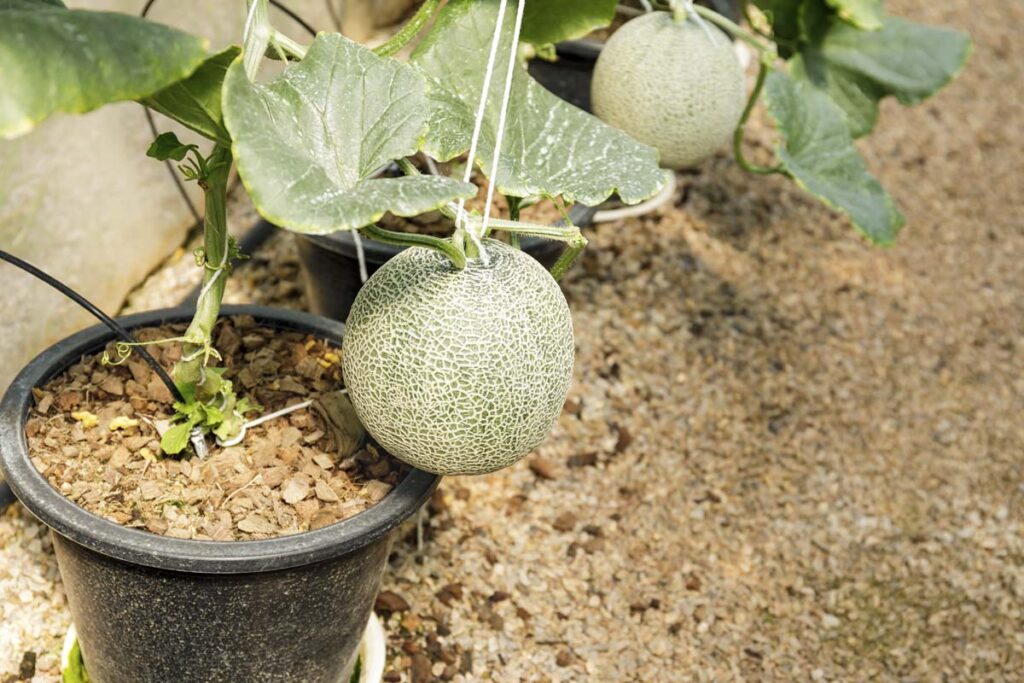
3. Preparing the Perfect Container
Cantaloupes grow best in large containers because their roots spread widely.
Container requirements:
- Depth: At least 12–16 inches.
- Width: 18–20 inches or more.
- Material: Use HDPE grow bags, old paint buckets, cement pots, or recycled drums.
- Drainage: Make 5–6 holes at the bottom for excess water.
For hanging or vertical systems, choose lightweight containers and reinforce them with strong ropes or metal frames.
4. The Ideal Soil Mix
Cantaloupes love loose, rich, and well-drained soil. Since we’re growing in pots, you must create a balanced potting mix that retains moisture without staying soggy.
DIY Soil Recipe:
- 40% garden soil (loamy)
- 30% compost or well-rotted cow dung
- 20% coco peat or sand (for aeration)
- 10% vermicompost or leaf mold
Mix in a handful of neem cake or wood ash to prevent pests and improve soil structure.
This blend provides all the nutrients needed for healthy vine and fruit growth.
5. Planting the Seeds
You can start cantaloupe either by direct sowing or transplanting seedlings.
Direct sowing method:
- Fill your pot with the prepared mix.
- Make small holes about 1 inch deep.
- Sow 2–3 seeds in each hole.
- Cover lightly with soil and water gently.
Seeds typically germinate in 5–10 days, depending on temperature.
Once seedlings reach 4–5 inches tall, thin them out — keeping only the strongest plant in each container.
6. Ideal Conditions for Growth
Cantaloupes are warm-season plants that thrive in sunlight and heat.
Environmental needs:
- Sunlight: At least 6–8 hours of full sun daily.
- Temperature: Between 22–35°C (72–95°F).
- Humidity: Moderate, with good airflow to prevent fungus.
If you’re growing on a terrace, position your pots where the vines can climb or hang freely — near railings or trellises.
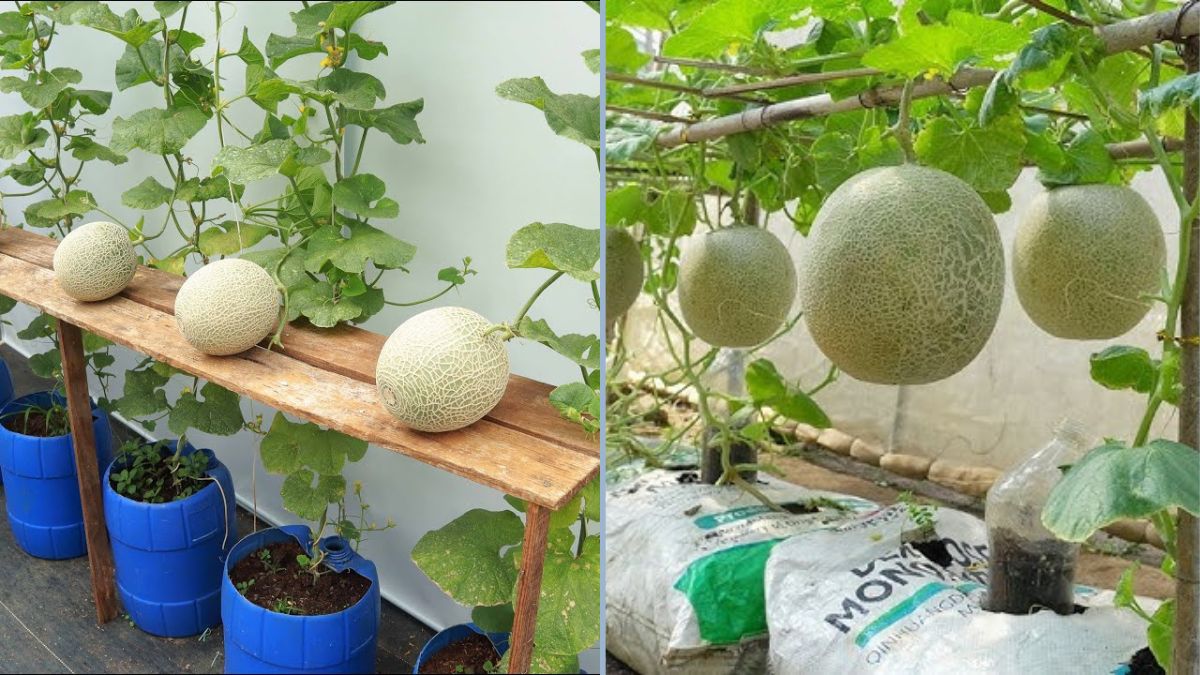
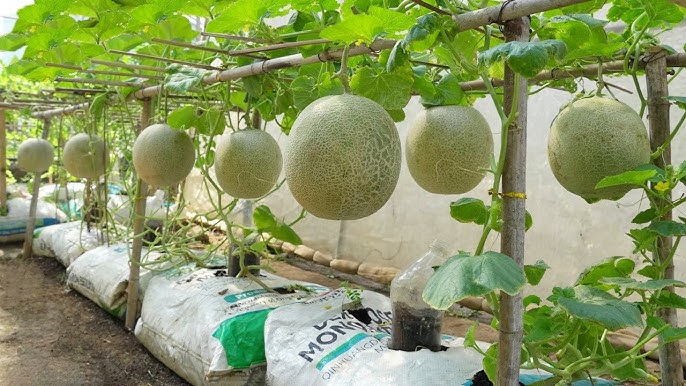
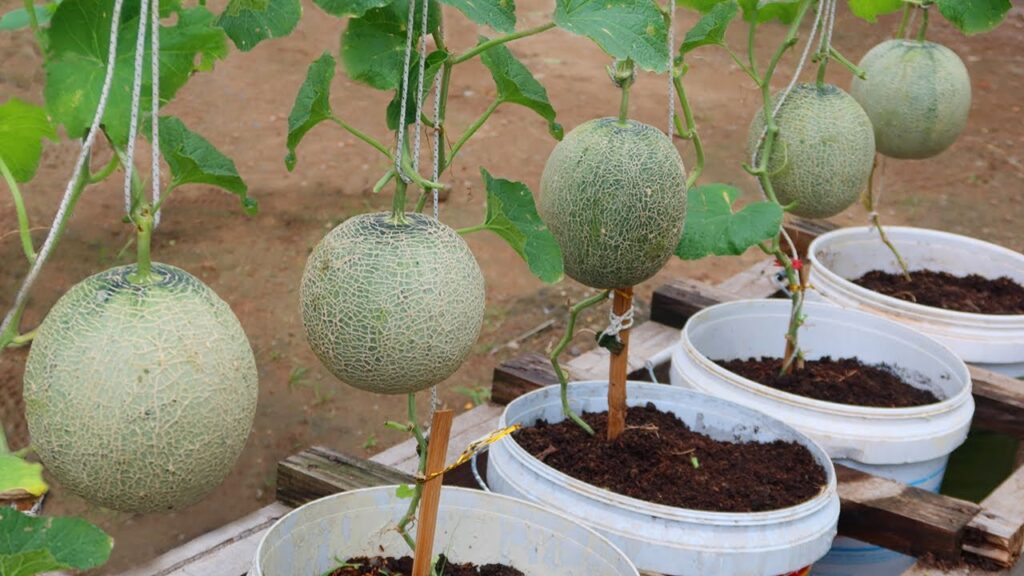
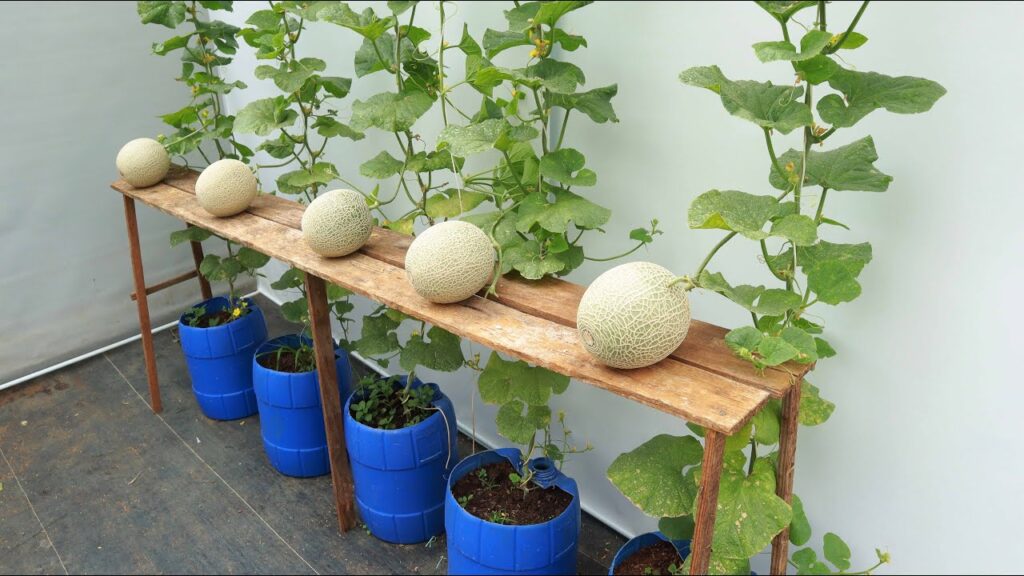
7. The Special Hanging Melon Growing Method
This is where the real magic happens. Instead of letting vines sprawl across the ground, we train them to grow vertically — using trellises, ropes, or nets — and let the fruits hang in hammocks as they mature.
Here’s how it works:
- Install supports:
- Use a strong bamboo frame, iron rods, or nylon mesh.
- Set up a vertical trellis about 5–6 feet tall.
- You can also hang ropes from a railing or pergola for vines to climb.
- Train the vines:
- Once your cantaloupe plant grows 1–2 feet tall, gently guide it up the support.
- Tie it loosely with soft twine to encourage upward growth.
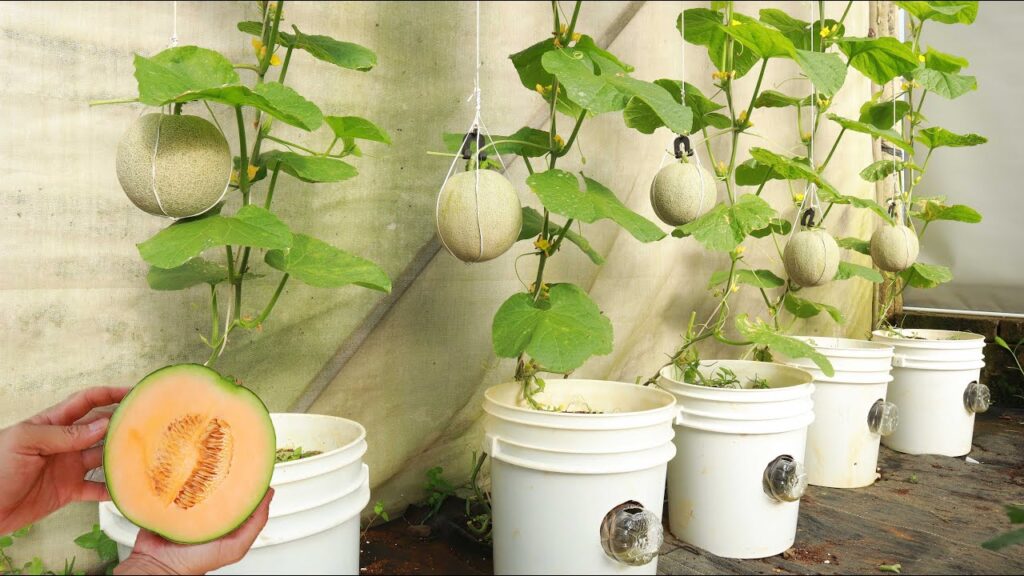
- Add fruit hammocks:
- As small melons begin to form, they’ll get heavier.
- Support each fruit with a cloth, net bag, or piece of old fabric — tied to the trellis.
- The “hammock” prevents the fruit from snapping off and ensures even ripening.
This special method allows fruits to hang in the air, receiving uniform sunlight and airflow — which results in sweeter, cleaner, and larger melons.
8. Watering and Feeding Schedule
Cantaloupes need consistent moisture during growth but dislike soggy roots.
Watering tips:
- Water deeply 2–3 times per week.
- Keep the top layer moist but not wet.
- Avoid overhead watering to reduce the risk of fungal infection.
- Reduce watering slightly as fruits begin to ripen — this concentrates the sweetness.
Fertilization routine:
- At planting: Mix compost or cow manure into the soil.
- After 3 weeks: Add a handful of vermicompost or balanced organic fertilizer (NPK 10-10-10).
- During flowering: Use bone meal or banana peel compost for potassium.
- During fruiting: Apply liquid compost tea every 10–15 days.
Avoid chemical fertilizers — organic feeding ensures natural sweetness and better soil life.
9. Pollination: Key to Fruit Success
Cantaloupes have male and female flowers on the same plant.
For fruit to form, pollen must move from male to female blooms.
- Male flowers: Appear in clusters, long and thin stems.
- Female flowers: Have a tiny round bulge (baby fruit) behind the petals.
Hand pollination method (if bees are scarce):
- Pick a freshly opened male flower early in the morning.
- Remove its petals to expose the pollen.
- Gently brush the pollen onto the center of a female flower.
- Repeat for several flowers.
You’ll know it worked when the small melon starts swelling after a few days!
10. Pruning for Better Yield
To encourage more fruiting and stronger vines:
- Pinch off the tip of the main vine after it reaches 3–4 feet.
- This stimulates side shoots, which usually bear the female flowers.
- Remove any yellow or weak leaves to improve air circulation.
Healthy pruning directs the plant’s energy toward producing larger, sweeter fruits.
11. Managing Pests and Diseases
Because cantaloupes are grown in warm, moist conditions, they can attract a few common pests.
Watch out for:
- Aphids
- Whiteflies
- Spider mites
- Powdery mildew
Organic control tips:
- Spray neem oil solution (5 ml neem oil + 1 liter water + a few drops of soap).
- Apply once a week during early morning or evening.
- Keep the leaves dry and avoid overcrowding plants.
Good air circulation and sunlight are your best natural defenses.
12. Fruit Development and Ripening
After successful pollination, cantaloupe fruits grow quickly. You’ll notice small green melons swelling into round, netted beauties over 4–6 weeks.
Tips for healthy fruit growth:
- Keep fruits supported in hammocks — never let them rest on soil.
- Turn the fruit gently every few days to ensure even ripening.
- Feed potassium-rich fertilizer for improved sweetness.
When hanging, the fruits get better airflow, ripen evenly, and develop a stronger aroma.
13. Harvesting Your Homegrown Cantaloupes
Cantaloupes are usually ready for harvest in 75–90 days from planting, depending on the variety and temperature.
Signs of ripeness:
- The netting pattern becomes more pronounced.
- The skin color changes from dark green to yellow-tan.
- The fruit gives off a sweet, musky aroma near the stem.
- The stem starts to crack or detach easily.
Gently twist or cut the melon from the vine — don’t pull it off.
Allow it to rest for a day or two indoors before slicing for maximum sweetness.
14. Common Problems and Quick Fixes
| Problem | Possible Cause | Solution |
|---|---|---|
| Flowers falling off | Poor pollination | Hand-pollinate early morning |
| Yellowing leaves | Overwatering or lack of nutrients | Check drainage, feed compost |
| Fruits cracking | Uneven watering | Maintain steady moisture |
| No fruit set | High heat or lack of pollinators | Provide shade & hand pollinate |
15. Why the Hanging Melon Method Works So Well
The secret behind this method’s success lies in the air circulation and light exposure.
When cantaloupe fruits hang freely:
- They don’t touch the soil — no rot or fungus.
- Air and sunlight reach all sides, enhancing sweetness.
- Gravity helps the fruit grow round and firm.
- You save space and get cleaner, blemish-free melons.
This is perfect for urban gardeners, balcony growers, and terrace farmers who want high yields from small spaces.
16. Final Thoughts: Sweet Rewards from Your Hanging Garden
Growing cantaloupe at home using the hanging melon method is more than just gardening — it’s a satisfying journey from seed to sweetness.
You’ll watch green vines climb, flowers bloom, and golden melons ripen in midair — all while recycling space and nurturing nature.
With the right soil, sunlight, and care, your cantaloupes will be large, aromatic, and delightfully sweet — proof that you don’t need acres of land to grow amazing fruit.
So, grab a few seeds, an old pot, and some ropes — and start your homegrown hanging melon garden today. The next time you slice into a juicy cantaloupe, it’ll taste even better knowing you grew it yourself.
Would you like me to include SEO metadata (like title tag, meta description, and keywords such as grow